
Research by Steyr showing the movements of 4 types of airrifles
Recoil in PCP airrifles?
A lot of shooters think pre-charged pneumatic airguns have no recoil. But shooters that are keen observers will notice that these rifles do raise their muzzle at the shot. Even the relatively low powered 7,5 Joule / 6 fpe rifles show a reaction to the shot. The picture above is from an old Steyr advertisement and shows barrel vibrations of the Steyr LG100 rifle compared to three other makes (my guess is Feinwerkbau (red), Anschutz (dark blue) and Walther (light blue)). Steyr was at that time ( I guess mid 1990’s?) one of the first to use a “Stabilizer” system to counteract the recoil. A plunger inside the bolt is released by the shot impulse and is pushed backwards by a small spring. Feinwerkbau (starting with the 603 rifles) uses some air from the shot to push a plunger backwards.
These movements at the release of a shot are caused by:
1. The acceleration of the pellet in the barrel and
2. The air jet that leaves the muzzle when the pellet exits.
There is also movement caused by the movements of the hammer/striker that opens the firing valve. The general principle to reduce or eliminate these movements or vibrations is to create a moving mass in the opposite direction.
Recoil absorption in Walther airrifles
Walther PCP air rifles have devices installed to reduce or eliminate the movement of the rifle when a shot is fired. The use of these Absorber (LG300) or Equalizer (LG400) systems started with the introduction of the LG300 rifle.
In the LG200 rifles (that preceded the LG300 series) a system with 7 small steel balls inside the hammer was used. These reduce the bounce of the hammer and thus prevent more movement than necessary to open the firing valve. This can reduce the back bouncing movement of the hammer and thereby vibrations and air consumption.

1. LG200 Striker with balls inside
LG300 Spring driven plunger type Absorber system
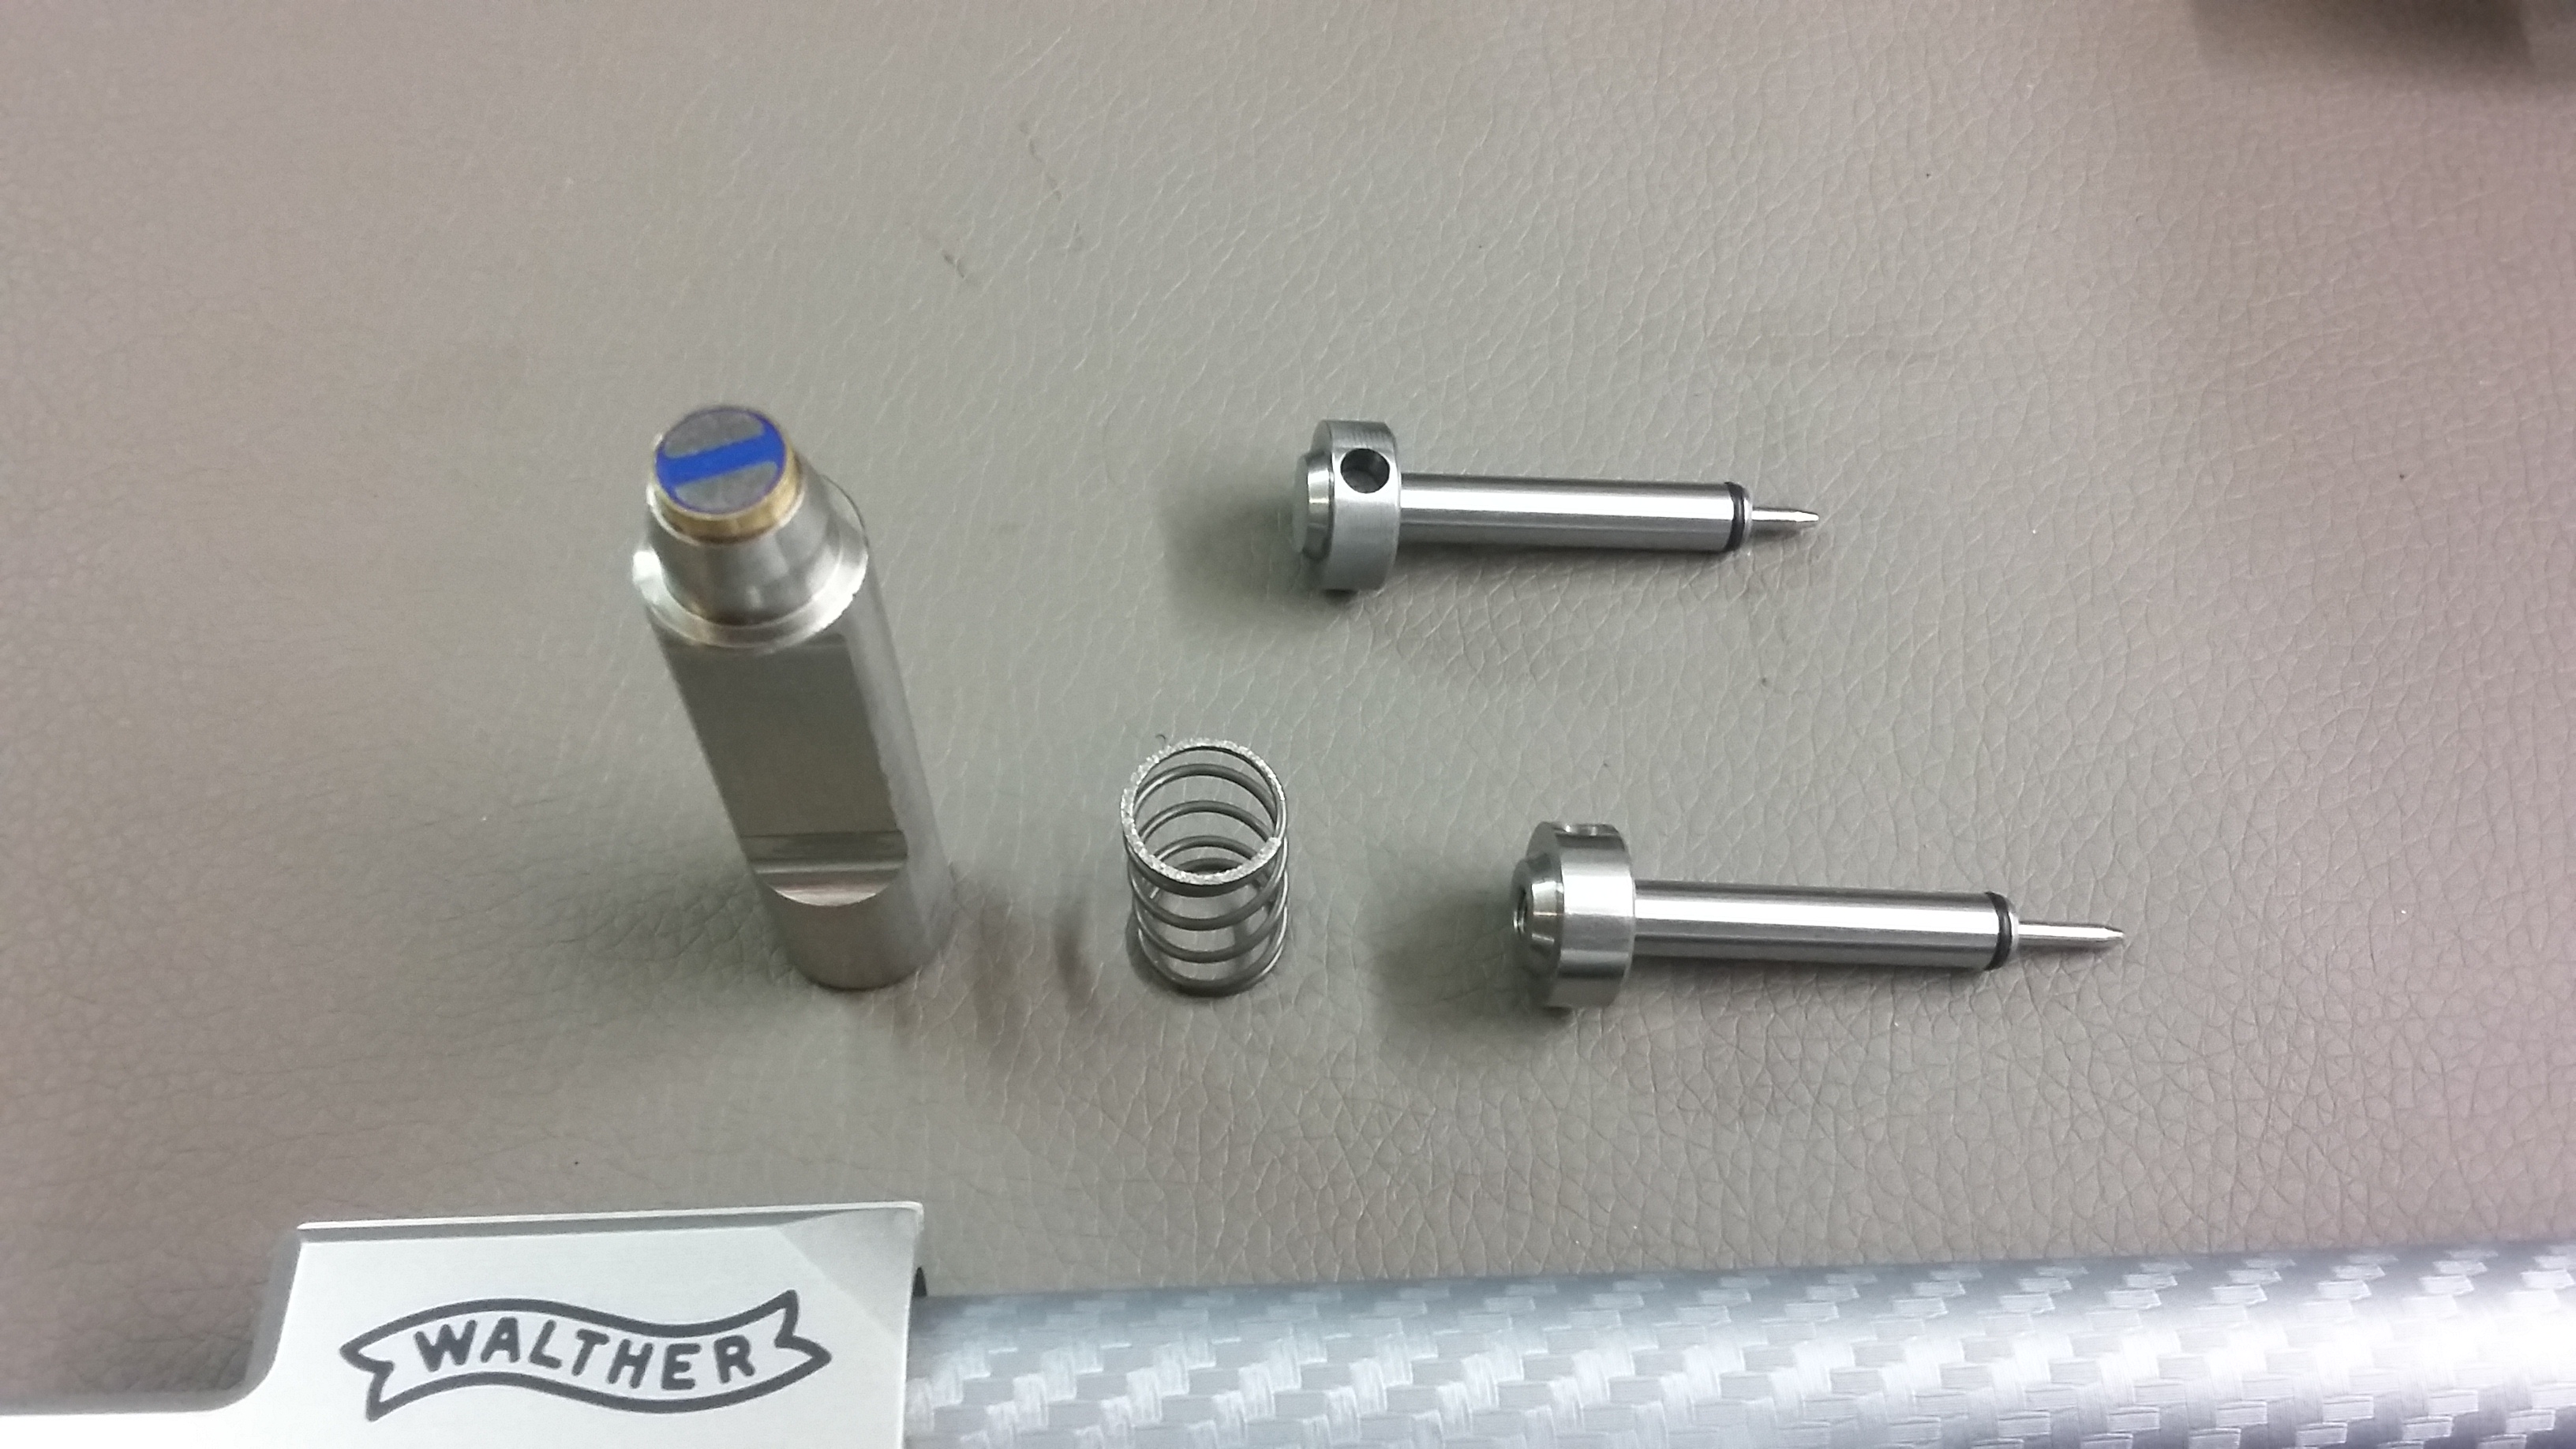
The LG300 series introduced an spring loaded Absorber (pict. 2 and 2A). Some air from the shot is directed backwards through the pellet probe (no. 26) and a plunger (no. 27) moves backward against a spring to counteract the forward moving pellet.

2. Walther Drawing no. 265 07 11 LG300 Spring Absorber
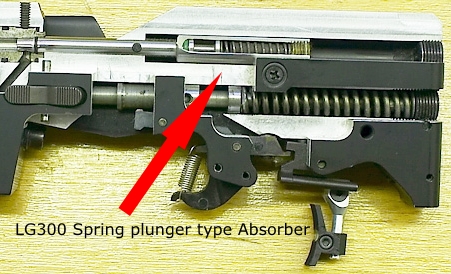
2A. Cut away view of the LG300 spring/plunger type Absorber system
I have used an 7.5 joule LG300 with this type of Absorber for some years. I noticed that this old spring driven plunger type Absorber is not as good in reducing felt recoil compared to the Steyr and Feinwerkbau systems. Probably the reason why Walther developed a newer and better Absorber system.
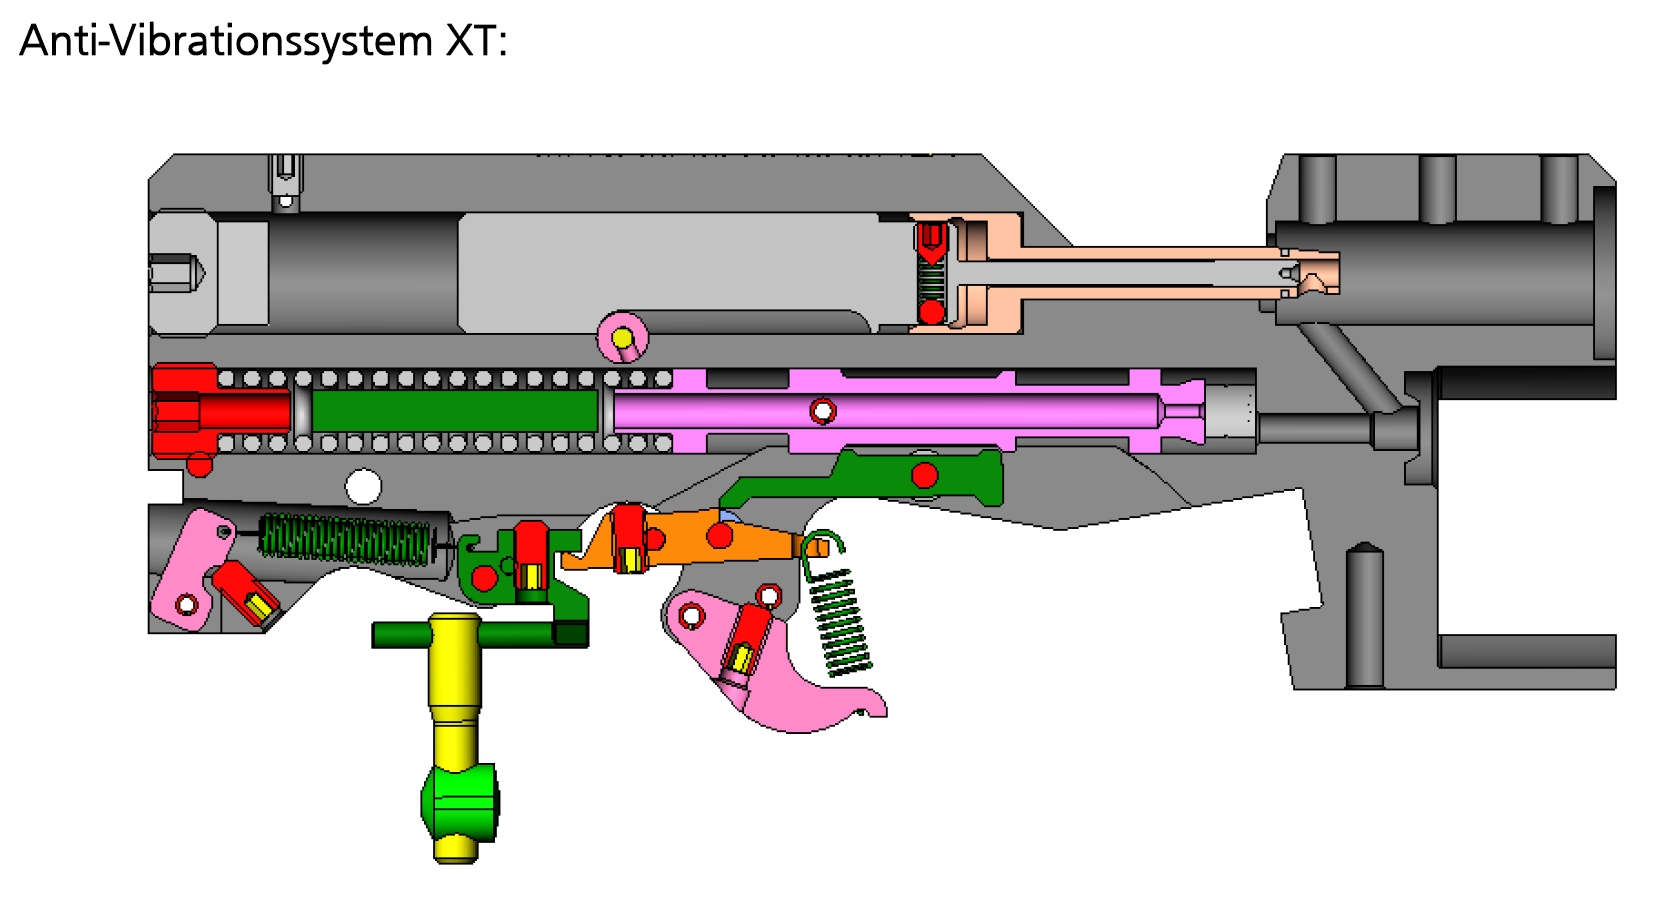
LG300 XT Pneumatic driven Absorber
The next version is a pneumatic system in the LG300 XT series (pict. 3 and 4). The absorber mass (no. 30) is pushed backward by some air form the shot. It hits a cushion of air inside the hole in the breechblock and at the end of its strike meets a soft cell foam pad (no.32) to stop it. It can be adjusted by a screw from the top of the breechblock. This screw adjusts the opening through which the air can leave the chamber behind the absorber mass. It regulates the speed and amount of movement of the absorber mass.

3. Walther Drawing 268 11 02 LG300XT Pneumatic Absorber
LG300 XT Pneumatic Absorber

LG300 XT pneumatic absorber
The LG300 and LG400 Magnetic Absorber / Equalizer

5. Walther Drawing 275 23 10 LG300XT Protouch Magnetic Absorber
The newest version is used in the LG300 XT Carbontec, LG300 Pro-touch (pict. 5) and in the LG400 (pict. 6). In this system the absorber mass (pict. 5 no.27) is held forward with a magnet (no. 26) . The impulse of the air the hits the pellet probe at the shot. This impulse (shock) overcomes the magnetic force. Then the absorber mass is pushed backwards by a spring. The Magnetic Absorber does NOT use any air. There is no channel in the pellet probe to guide air backwards. It is only the shock of the sudden air pressure on the front of the pellet probe that overcomes the magnetic force that keep the pellet probe and magnet together. The spring force is used to drive the Absorber mass backwards.
Picture 6 is from the LG400 and shows part no. 29 in two different versions. One with and one without the load indicator (top) that shows if a pellet is loaded in the barrel. Originally the LG400 cheaper Basic or Economy did not have the load indicator but these days it seems all LG400 versions do have the load indicator system.

6. Walther drawing 277 73 98 LG400 Absorber/Equalizer
The 16 and 21 Joule Walther field target and hunter rifles.
All the above shown systems are for the 10 meter 7,5 Joule versions of the Walther air rifles. The LG300 Dominator and LG300 Hunter rifles at 16 and 21 Joule do NOT have such a system. They still use the old type pellet probe (pict 7. no 26) that is assisted by as spring (no. 30) to keep it closed. This loading system dates back to the LG200.

7. Walther Drawing 266 81 90 LG300 Dominator. No Absorber is installed

LG300 Absorber and Dominator Pellet probe
Testing Absorber functioning
An recoil absorption system is used in the Steyr 16 Joule LG110 FT rifles and when correctly set up seem to make quite some difference in perceived shot reaction.
So I have the idea to test the difference in shot reaction between my converted LG300 with spring absorber and my LG300 Dominator without one. For that I need to buy an accelerometer and equipment to read it’s signal. I got some good info on this from Sighter. He tested his 16 joule LG400 with the magnetic absorber on and off. This showed that the absorber still does something at 16 Joule.

LG400 Absorber On (courtesy Sighter)

LG400 Absorber Off (courtesy Sighter)
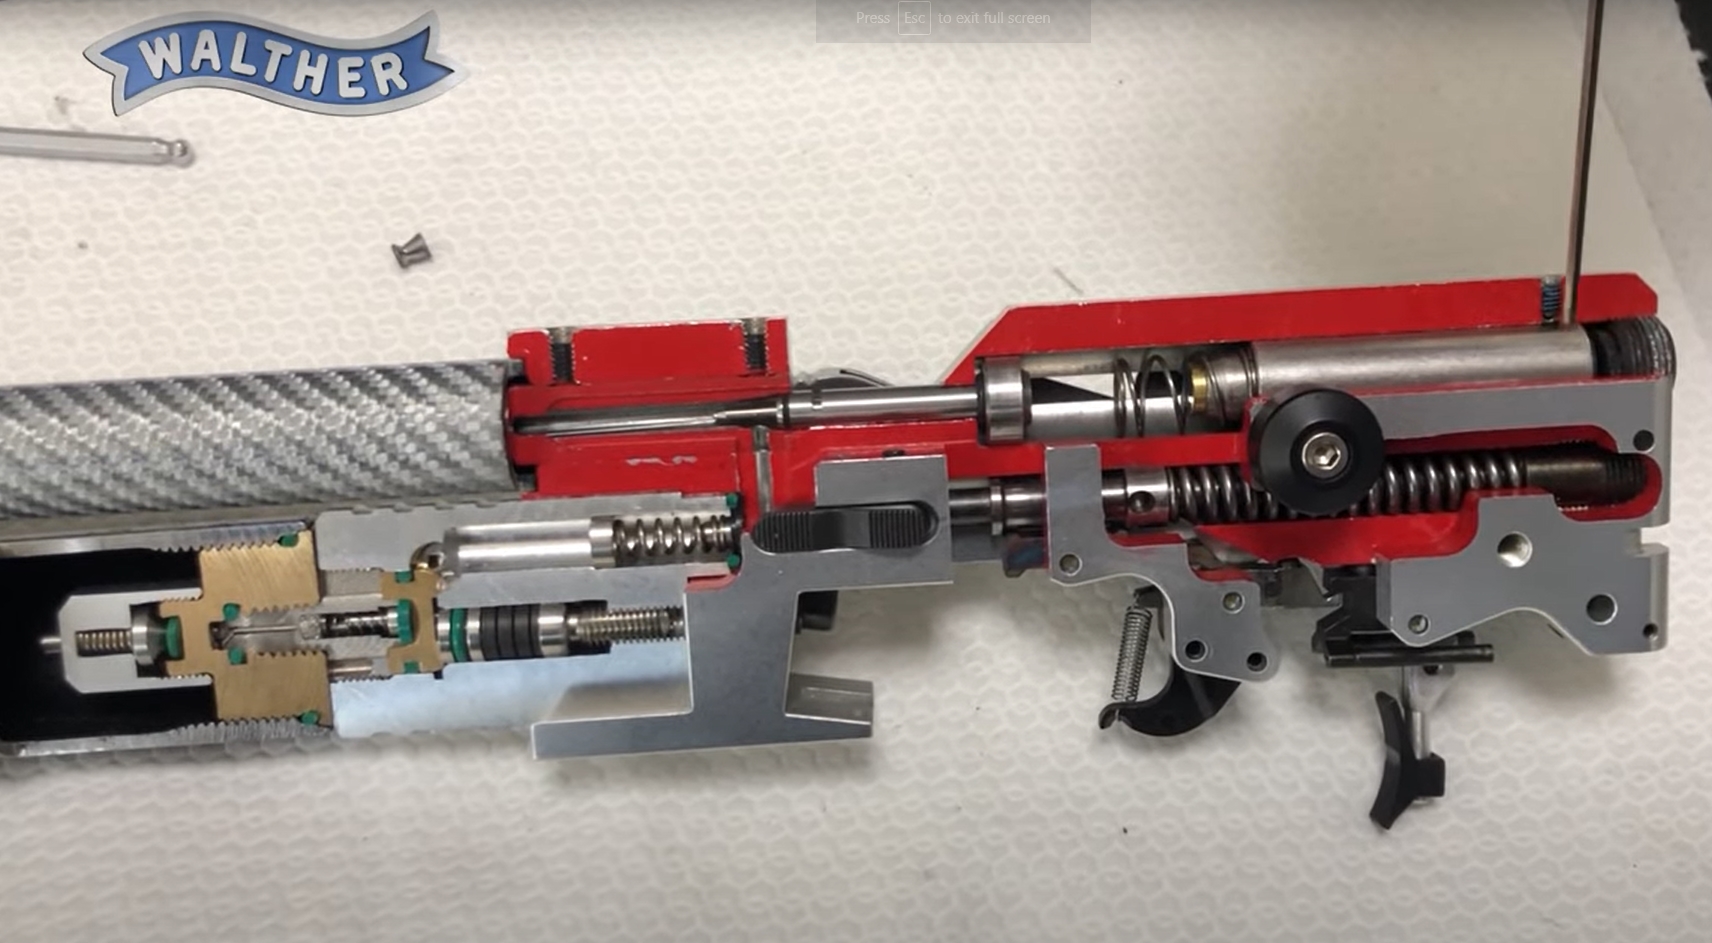
Walther LG400 cut away view
Adjusting the Walther LG400 Absorber system
Added in July 2021: There is a youtube movie by Walther of how to adjust the Absorber. Its of course much better to watch a Walther professional mechanic do this than to read my write up below.
BEFORE WORKING ON YOUR RIFLE MAKE SURE IT IS SAFE TO WORK ON IT!
- CHECK THAT IS DOES NOT HAVE A PELLET IN THE BREECH OR BARREL
- REMOVE THE AIR CYLINDER (PRESSURED AIR RESEVOIR)
- FIRE THE RIFLE 3 TIMES IN A SAFE DIRECTION TO MAKE SURE ALL THE PRESSURED AIR HAS LEFT THE RIFLE AND THAT IT IS EMPTY OF PRESSURED AIR
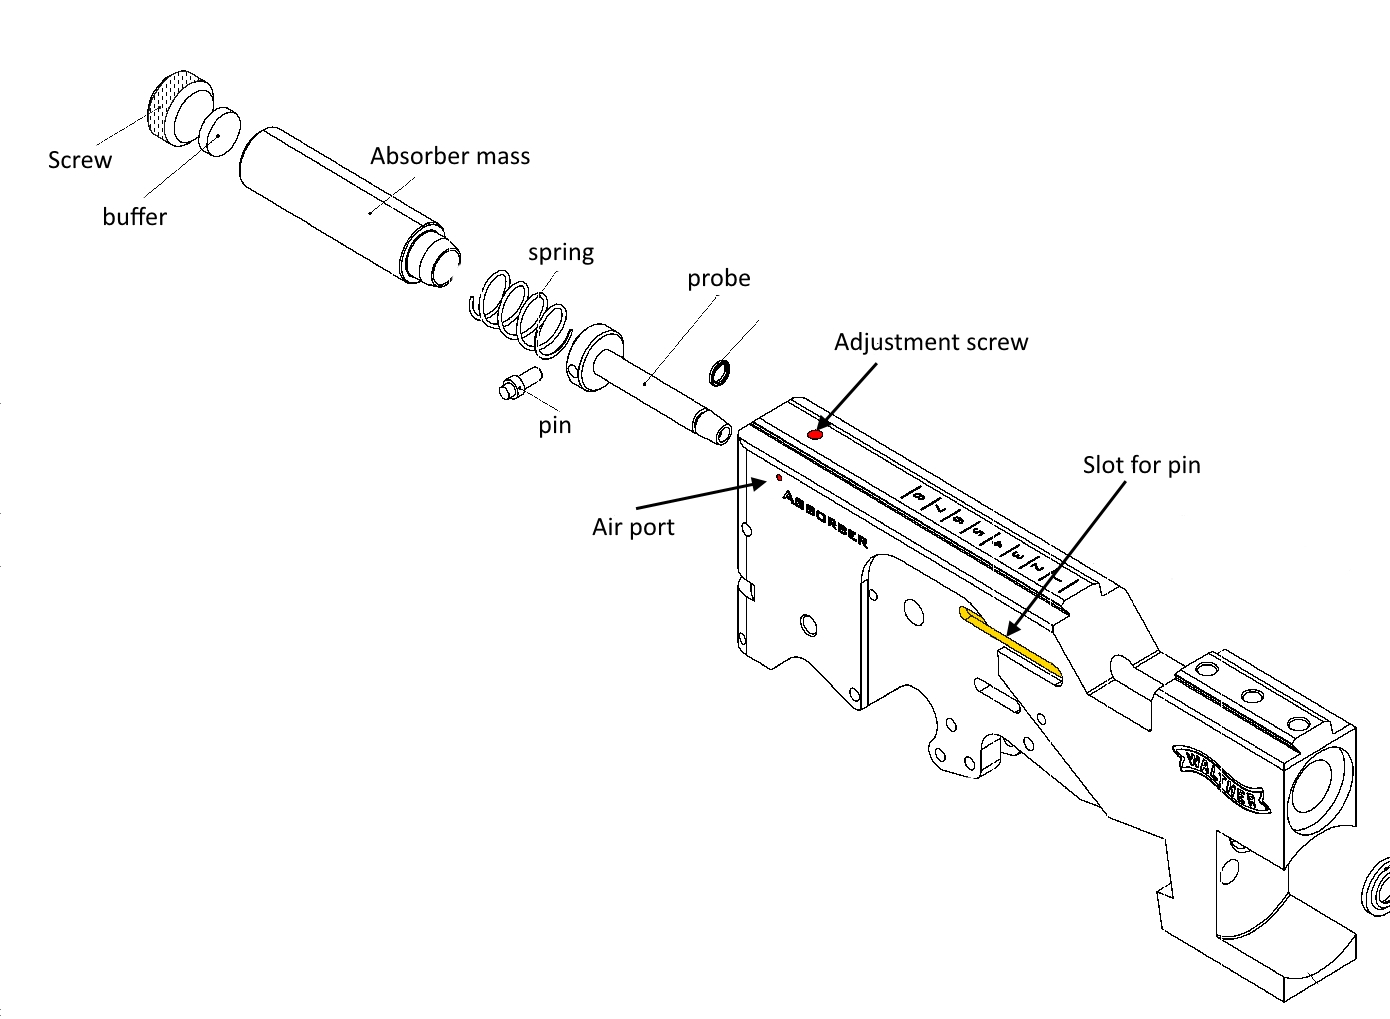
The LG400 Absorber or Equalizer system can be adjusted very easily by the user. There is an adjustment screw on the outside of the rifle for this. (see drawing below).
The Absorber works by moving a piece of steel (the Absorber mass (yellow)) backwards by a spring (blue). This Absorber mass is held in its forward position by a magnet (red) inside the Absorber mass. This magnet sticks the Absorber against the rear of the pellet probe (green).
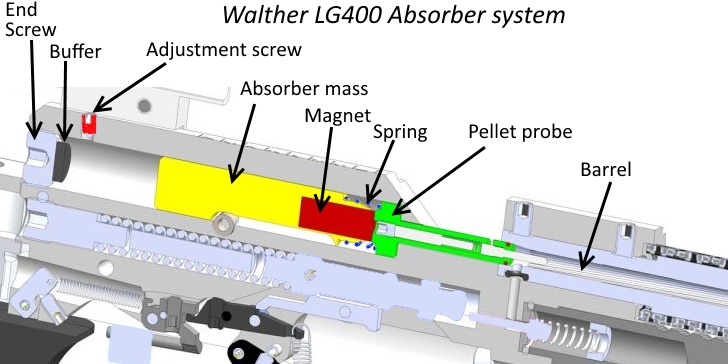
Walther LG 400 Absorber system cut-away-view
The impulse force of the shot against the pellet probe overcomes the magnetic force and the Absorber mass is propelled backwards by the spring. The Absorber moves backwards inside a channel (a hole) in the breech block that is closed at the end with an end screw.The fit of the Absorber in this hole is so tight that the air inside the hole cannot escape quickly enough. Air pressure is built up by the moving Absorber and this acts as a brake, slowing down and finally stopping the Absorber movement.
This channel or hole in which the Absorber moves has two very small ports at each side of the breech block to let some air out. The amount of air that can flow out through the ports is restricted by a small grub screw on top of the breech block, in the center of the dovetail. This screw can be adjusted to let more or less air out. This affects the movement of the Absorber.
When the ports are fully closed the Absorber moves only a short way and brakes very hard. When the ports are fully open the Absorber moves fast and will not brake, it will hit the buffer that sits on the end screw.
Both the situations are not optimal. By screwing the adjustment screw in or out the travel of the Absorber can be controlled.
With the adjuster screw turned out (up) you can see when the ports are fully open when you can see through the holes at the side of the breech block. Hold it against a light.
The amount of travel of the Absorber is visible through a slot (yellow in the drawing) in the breech block. This is the slot where the pin that moves the pellet probe goes through.
To adjust the Absorber and to see how far it moves you have to shoot the rifle with a pellet. Without a pellet fired the Absorber will react differently and in some rifles it may not even move at all.
Before changing any setting it’s good to check how far the Absorber moves. You can do this by shooting the rifle with a pellet loaded (make sure you have a safe backstop!) and holding the rifle still and horizontal, lying on a table for instance. After the rifle has been fired take something soft, a toothpick, and use it to push the Absorber mass further backwards through the slot in the side of the breech block. If your Absorber has 3 to 4 millimeter movement left it is quite well adjusted. This is an optimal setting in my rifle.
If you find your rifle kicks too much (has a lot of shot reaction) and it looks like your Absorber has some travel left (more than 3mm) you could adjust the screw. Turn the screw at the top out (counter clock wise) for a quarter turn and try again.
If there is no travel left you need to adjust the set screw inwards (clockwise).
It can also be that the rifle kicks because the Absorber mass hits the rear screw with buffer. In that case you need to close the ports by turning the screw in (clockwise) so the braking force of the air is increased. In this case it may look like you have some Absorber travel left. But that is because the Absorber bounces back from the buffer.
It’s a good idea to write down any adjustments you make, or measure the depth of the adjustment screw with a caliper, so you can always return to the original setting.
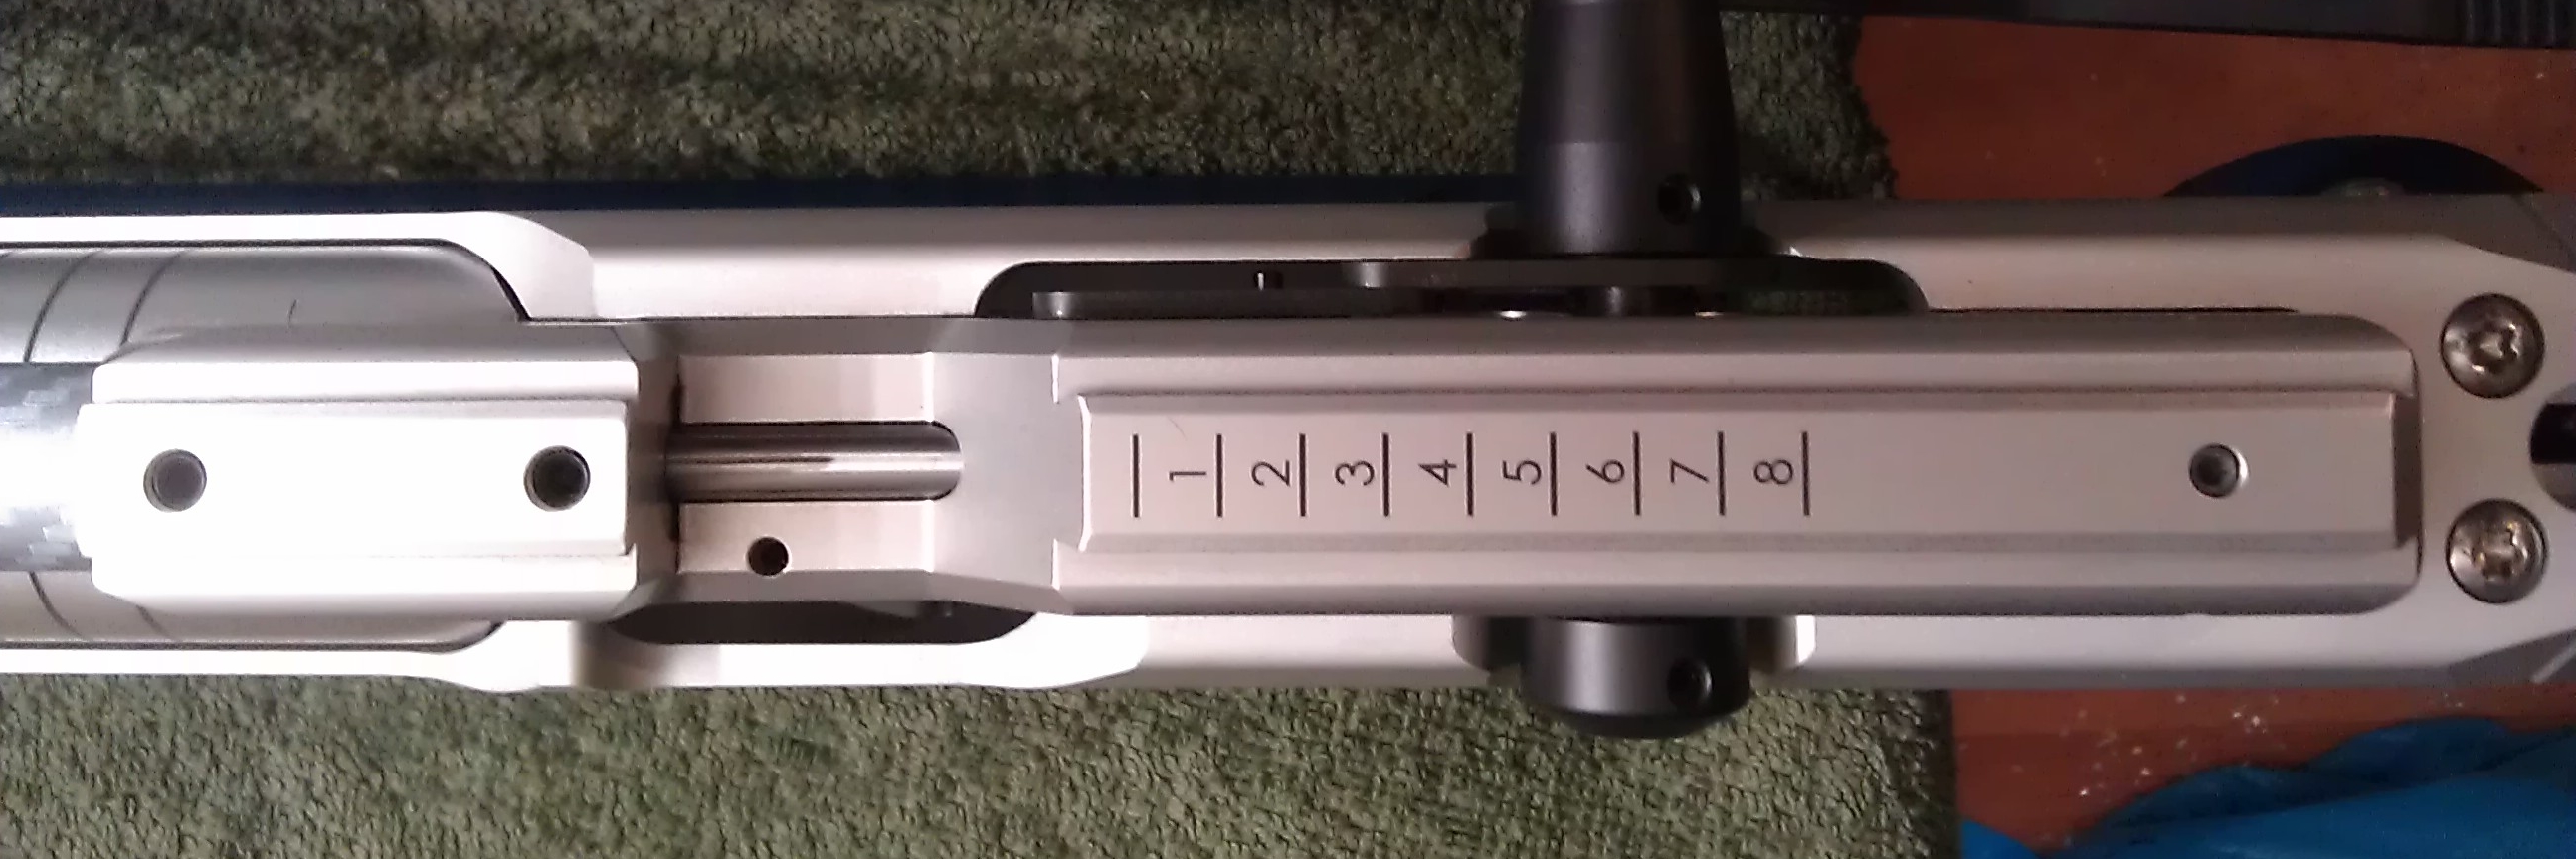
Walther LG 400. The Absorber adjustment screw is the small grub screw visible on the right hand side on top of the breech block.
LG400 Magnetic Absorber System
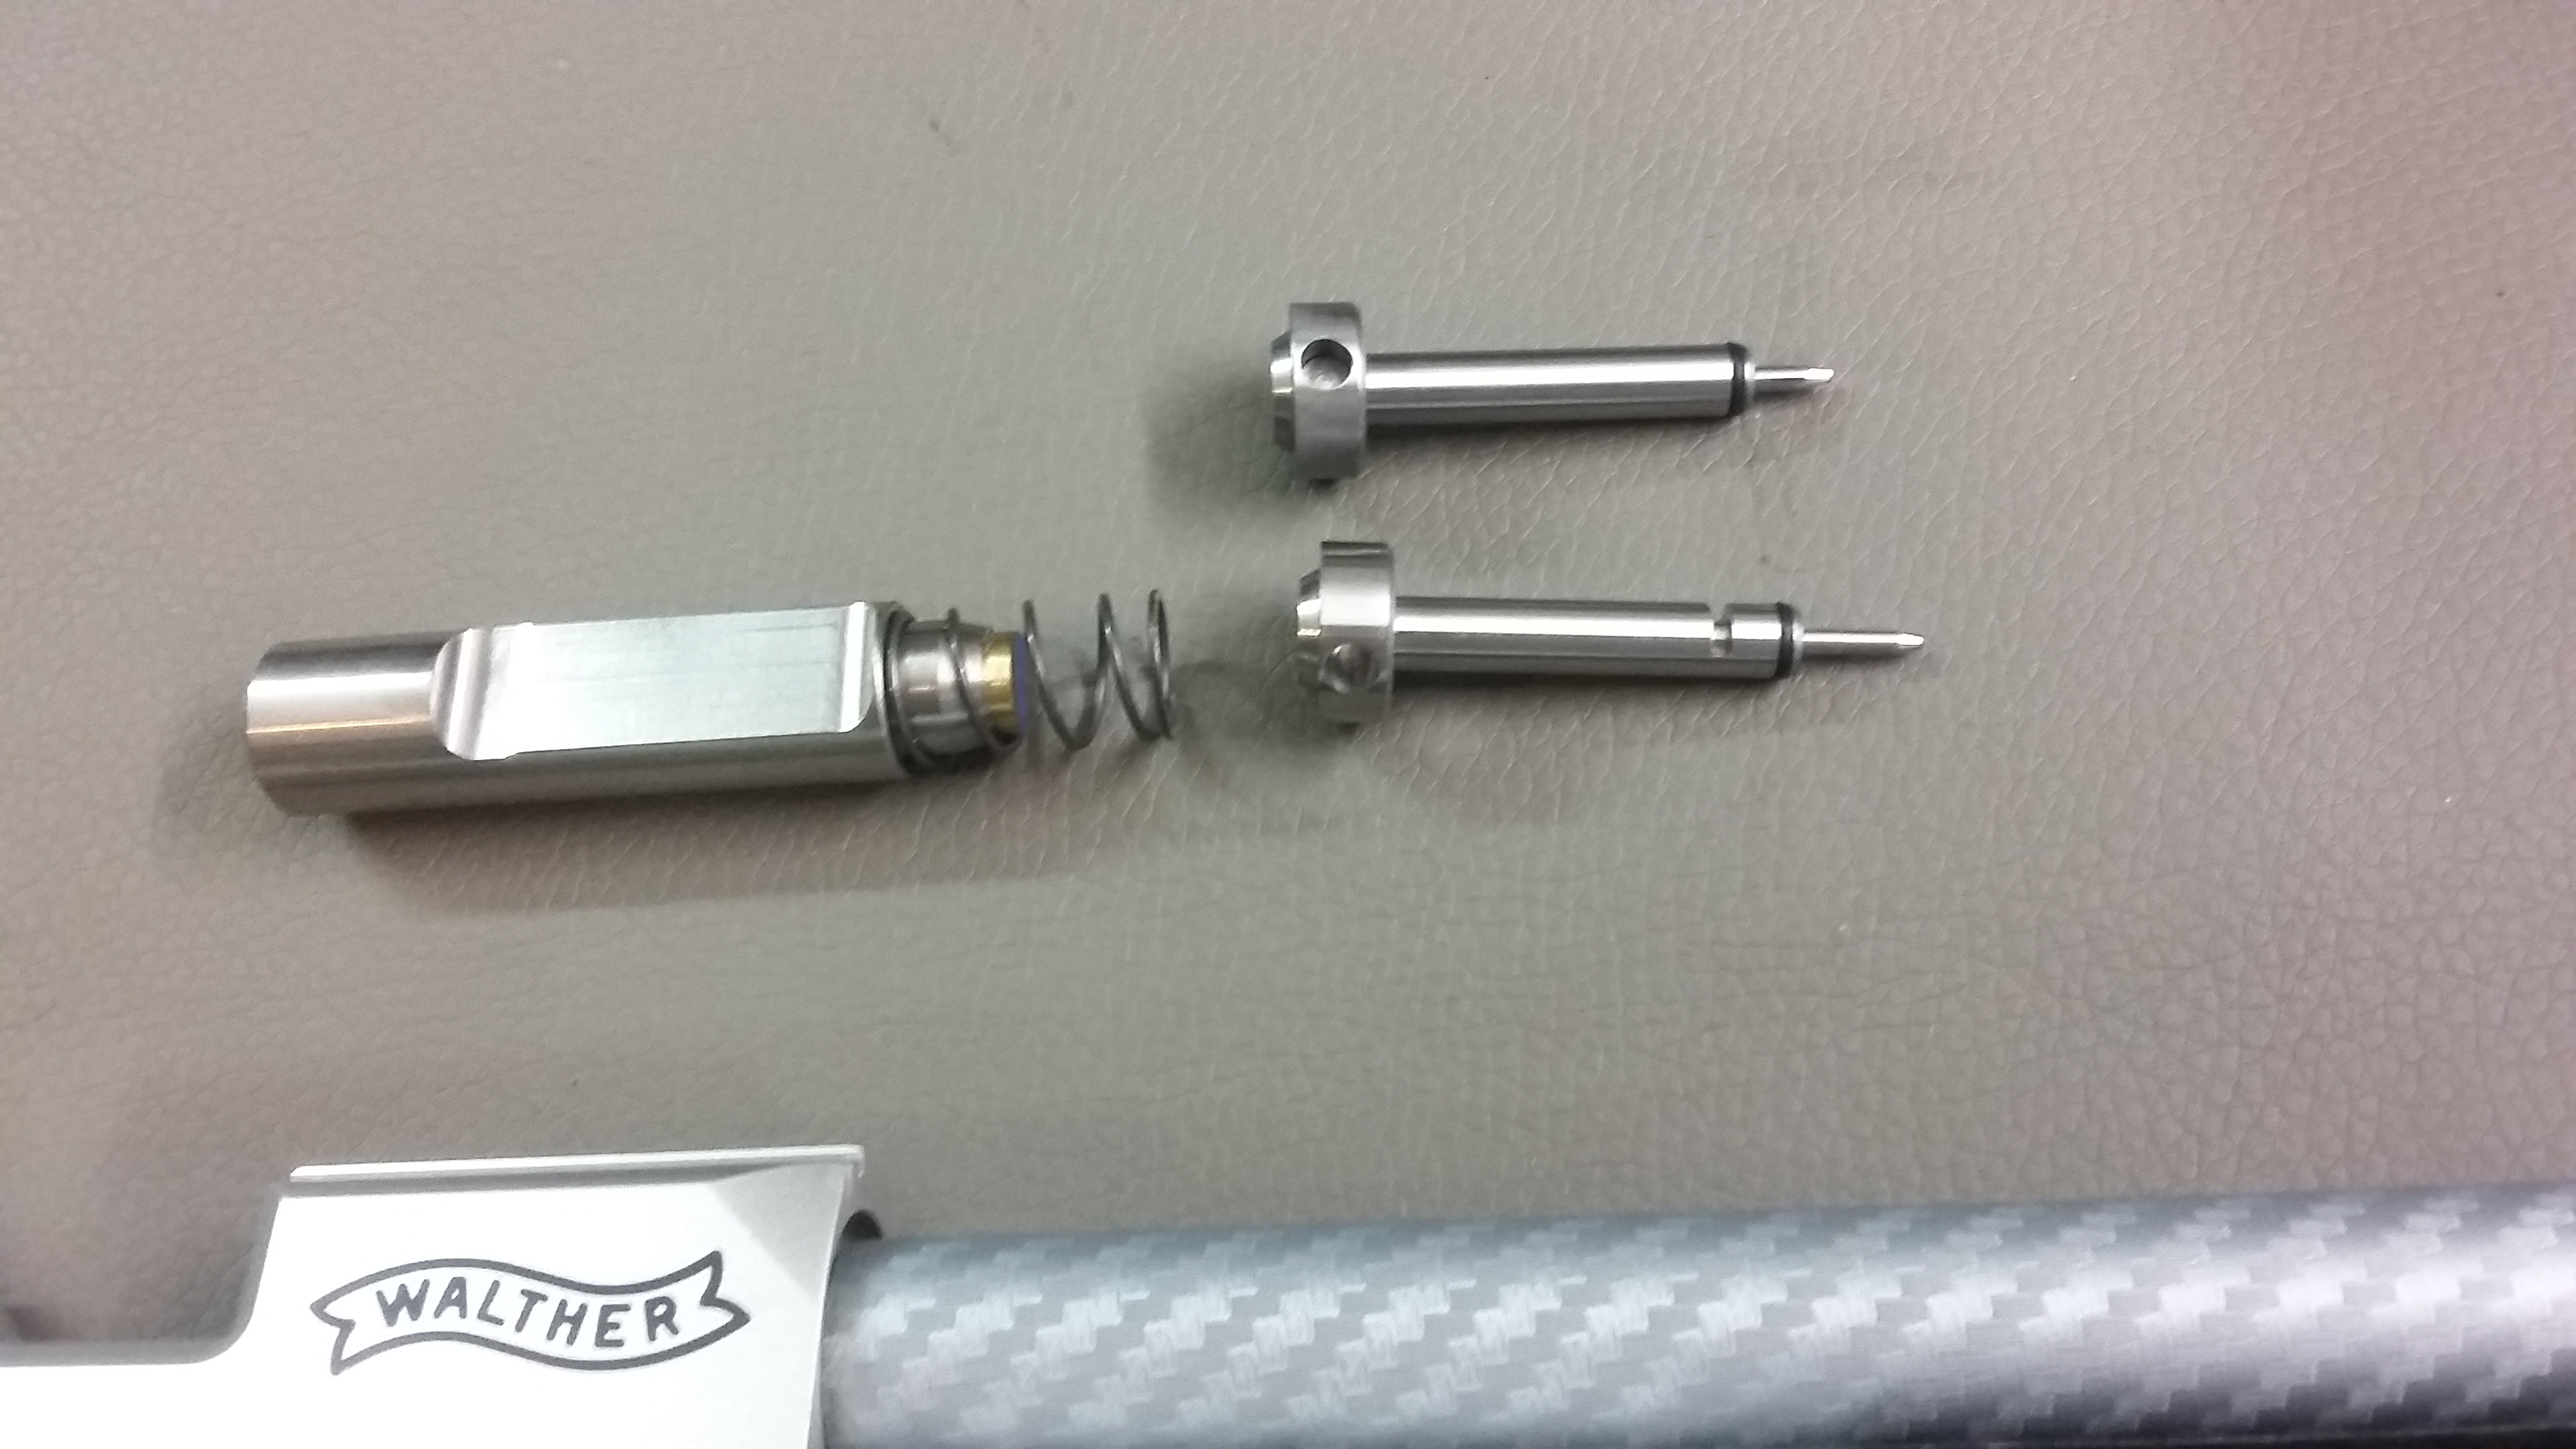
1. LG 400 Absorber. (the upper pellet probe has no load indicator, for the LG 400 versions without Absorber system and load indicator)

2. LG 400 Absorber
3. LG 400 Absorber
Instructions for Installation of the Absorber system in the Walther LG400
By ‘Louis’ O’Connor
Disassembly:
Remove the cylinder, de-cock the action and clear the barrel with a safety line
before starting work. [Part numbers] as per Walther drawing LG400_System_2777398_g.pdf, {see drawing below}
The stock is fastened to the barrelled action by 4 screws:
• One [62] under the front barrel clamp (3mm hex) [5].
• One at the rear of the fore-end, below the regulator (3mm hex). The fore-end rail [2] (‘hamster’) must be removed to access this screw.
• Two screws at the side, at the rear of the receiver (4 mm hex).
{Sven: the above disassembly instructions are for the LG400 Blacktec rifle only, the other LG400 types use only 3 screws: Two in the front barrel clamp and one at the rear of the fore-end below the regulator}
The Equaliser/Absorber cavity plug [28] is Loctited in, so the dismounted barrel action needs to be clamped carefully in a vice. Use a tight-fitting 4mm Allen key and be prepared to use considerable force. Some gentle local heat may also help break down the Loctite.
Before removing the loading lever assembly [3], note that the click-stop spring [39] and ball bearing [38] are held under tension by a grub screw (2mm hex) [63] alongside the trigger. Wind this grub screw out until flush with the receiver body or the ball bearing will fly out.
Hold on to the loading lever when loosening or tightening the loading lever shaft retaining screw [44].
Reassembly:
Apply a very light layer of Teflon* oil to the Equaliser counterweight [31] before insertion and Teflon grease on the loading lever shaft [13]. (*n.b. Steel/aluminium contact)
Insert the counterweight assembly [30]. Use a wooden cocktail stick to align it if necessary, ensuring the notch is in line with the loading lever shaft [13].
Use a dab of Teflon grease on the ball bearing [38] to hold it in position. Push it down into its well before inserting the loading lever shaft [13]. Carefully line up the studs on the loading lever bell crank [15] with the holes in the two toggle links [7, 18]. Refit the collar [20], cap [21] and screw [44] to the far side of the loading arm. Lightly tighten click stop grub screw [63].
Clean the cavity plug [28]. Glue on the buffer pad [32] with a strong adhesive; shoe glue (rubber solution) should be OK provided that no petroleum spray solvent, eg., Transyl. WD40, etc, is later used in this cavity. {Sven: I used superglue}
Lightly Loctite the plug thread and install the plug [28]. Torque to 1Nm.
Lightly apply Teflon grease to the stock/barrelled action mating surfaces and the paper shim. Refit barrelled action and stock (it drops in forwards and pulls back).
Replace the rear central action screw first, then the front, ensuring that the threads are not crossed. Check for central alignment and then fit the side screws to finger tight. Tighten all screws until they stop. Test weapon with dry firing.
Refit cylinder and test for real, with pellets, adjusting recoil counterweight roughly [screw 94]. Check for bedding anomalies.
Torque central screws to their maximum by hand, using a standard 3mm Allen key,
Torque the side screws to 2,5Nm in two stages using a torque screwdriver and a 4mm Allen head. Retighten the centre screws and final torque the side screws to 3 Nm (up to 4Nm max).
Reassemble the fore-end, etc, of the stock as necessary and finally adjust the recoil counterweight’s movement as required before refitting the sights.
N.B. Moving the loading lever to the left side allows the user to move the sights forward enough to access the Equaliser adjusting screw [94] without the loading arm binding on the windage knob. Unfortunately, the loading lever then turns against the thread so the screw will need thread locker to hold it.
© ‘Louis’ O’Connor, July 2017
{many thanks to Louis for this excellent write up, Sven}

Walther LG400 Exploded view

September 27, 2014 at 17:38
Hi Sven!
I have read your reports with very entusiasm.
I want to clean my No 29 Part on my LG300XT. Can i disassemble/assemble the whole Absorber and what must be observed on assembly?
Thanks a Lot!
Greetings.
September 29, 2014 at 06:45
Hello H,
I have not disassembled the XT absober myself. This means I cannot advise you by my own experience. But looking at the drawings it looks like a job that is not too complicated. But you do need to remove pin no. 9 that is connected to the linking plates. This means the cocking handle and all associated links need to be removed before you can remove the absorber and pellet probe. See the “Walther LG300 Tuning” page on this website to have a look at the setup and removal of this cocking assembly. The cocking handle itself needs to be removed as well because the axle of this keeps the absorber in place.
December 11, 2014 at 12:36
Hi Sven..
I’m very happy to see and read all your tests, it’s very interresting..
Can you say me how you can do these measurement of vibrations please ?
Have you a list of the parts and/or software for do this..
Many thanks to you..
Warmest Regards
Pascal
December 11, 2014 at 13:09
Hi Pascal,
Thank you for your kind words.
At the moment I am still busy acquiring the devices needed to measure the vibrations of an airrifle. So I have no working setup for myself at this moment. But it is nearing.
I have found two feasible options:
1. Using an accelerometer in combination with an Arduino micro computer board like Loki_79 has done ( from http://www.airgunforum.co.uk/forums/showthread.php/187402-Home-made-Accelerometer-Update )
2. Using an accelerometer in combination with an PC based USB Oscilloscope like the Hantek 6022BE ( http://www.hantek.com/en/ProductDetail_2_31.html ).
(the accelerometer is something like: https://www.sparkfun.com/products/9269 and would need an power supply as well)
Option 2 is probably more suited for me because it skips the building and programming the software for the Arduino board which would take some learning time. The disadvantage of using the (cheap) USB oscillosope is that it has only two input channels. And as one channel is needed to trigger the start of the measurement that leaves only one channel for measuring the accelerometer. And the accelerometer has 3 outputs. One for each movement axis X, Y and Z. I think I could do without the Z -axis but I would surely like to measure the X (longitudinal) and Y (vertical) movements of the barrel. An option is to buy 2 oscilloscopes to measure all three channels. But that would increase the costs. Two Hantek 6022BE oscilloscopes are cheaper than one 4 channel oscilloscope I have checked that.
I’m still working on this and I will publish the results here. I think I’ll start with one Hantek and see if the repeatability between shots in one movement direction is high. If so I could measure the X movement on one shot and the Y movement on another shot and combine them afterwards.
Sven.
December 21, 2014 at 17:24
Hi Sven,
Sorry for the delay (job).. and I would like to say you big thanks for your response..
I will keep you abreast of my future trials in case it can help you on your side.
Warmest Regards
Pascal
September 12, 2016 at 05:29
Hallo Sven
My name is Hein and I live in South Africa… Good friends with Gert.
I need some advise please.
How do I remove the screw at the back, it seems to be locked and I do not want to force the tool.
Do you recommend lubrication on the absorber mass.
Thank you
Regards Hein
September 12, 2016 at 11:06
Hallo Hein,
Thank you for your question.
I suppose you mean the big Allen screw at the back of the absorber hole?
On my own LG400 the screw was tight but not overtight. On another one I did it was quite loose, say hand tight only.
That is the only experience I have.
When yours is very tight it could be that Walther used some thread locker (Loctite) on your rifle. The rifles I did where from 2014. Walther may have changed their assembling procedure.
About the lubrication: When I took out the absorber I noticed a light coating of very light grease on them. It felt and looked about the same as the grease that Feinwerkbau and Anschutz (which is thinner than FWB grease, its more an oil) supply in those small white plastic tubes. This probably does not help much to select a grease for your absorber, but it is what I would use because I have those around. It’s not a silicone grease. I will ask my contact at Walther and see if I can get an answer. Will post it here.
Ik hoop dat alles best is met jullie in Zuid Afrika? Doe de groeten aan Gert als je hem spreekt.
Met vriendelijke groeten, Sven.
September 12, 2016 at 12:13
Hello Hein,
I got an answer very quickly.
The screw at the end end of the Absorber channel/hole has a threadlocker applied on assembly in the factory.
Normally they use blue Loctite. This should break with some force.
But for a while they used green Loctite. The advise to loosen this green loctite is to apply heat. Use either a heat gun, or even better a very small flame from a creme brulee torch directly on the screw. Do not give it too much heat, and try to unscrew frequently. The creme brulee torch is better because it can heat the screw directly without affecting the rest of the breechblock too much. And remember the screw has a small foam pad glued on at the inside. Too much heat may destroy it.
The way to lubricate the absorber depends. If you see a grease was used then apply grease again. A silicone grease is advised and it should not be too thin (contrary to what I thought and posted above). From the German description (Hahnfett) I think a normal o-ring silicone grease would do.
If the absorber feels dry when disassembled then keep it running dry.
When the absorber without lubrication hits the rear of the action with the setscrew closed all the way, you can use some silicone grease to get a better braking action, and prevent the absorber from hitting the screw.
I hope this helps. And it would be great if you could report back how you solved the problem.
Best regards, Sven.
September 13, 2016 at 04:23
Hi Sven
Thank you for the reply and information.
Absolutely fantastic information available here.
I have success, removed both of my LG400 screws and cleaned the action.
Once again, thank for an outstanding forum.
December 10, 2016 at 17:08
Hi , Millions Thanks for such info which was being searched by me since long time really felt good having read all the things much appreciated but I have one question here how do you get the info of vibration cycles mentioned in the graph is there any specific device ? being an electronic engineer I know about electronic accelerometer as you mentioned it so how it used to measure same could you plz let me know. Thanks a lot
January 4, 2017 at 16:08
Hello Sumit,
Please take a look at the answer I wrote to Pascal, above here dated December 11th, 2014.
If you have any more questions after that I’d be pleased to answer.
Best regards, Sven.
January 30, 2017 at 13:20
I have an LGM2 with walther factory converted to 300XT precharged air system. The bolt system is standard LGM2 and looks to be very similar to later models. Do you think it possible to use LG200 ballbearing bolt or LG300 absorber in my rifle?
January 31, 2017 at 08:08
Hello Luke,
I’m not familiar with the LGM2. So keep in mind my answer is a bit of a guess.
The LG300 absorber will not fit the LGM2. The hole for the absorber in the LG300 is much bigger than the hole for the pellet probe in the LGM2.
The LG200 striker with the balls may fit the LGM-2 depending on the dimensions and geometry of the striker itself and of the trigger sear in the LGM-2. From the parts drawings of the LGM-2 ( http://carl-walther.de/public/downloads/manuals/LGM2_2608138_g.pdf ) and the LG200 ( http://carl-walther.de/public/downloads/manuals/LG200_2630141_d.pdf ) it looks all very similar. And a lot of the part numbers are the same for the LGM-2 and the LG200.
So my guess is that the LG200 striker will fit the LGM-2. You can order the striker here at Schiesssport Billharz for 29 Euro: https://www.schiesssport-billharz.de/shop/de/2629488-schlagbolzen
This is without the bearing balls which you have to order separately. These are 2 Euro each and you need 10. (https://www.schiesssport-billharz.de/shop/de/Pos.-21-Kugel-25) but they are just 3mm diameter balls that you can probably just order anywhere on the internet for much less.
Good luck and please let us know how it went with the conversion.
Sven
July 22, 2017 at 11:21
Hi, Sven.
Thanks for the detail on adjusting the L400 Equalizer. I have just bought the Equalizer kit (2781573) to upgrade my Blacktec and your information will be precious. In effect, the Blacktech is a LG400 barrelled action in a LG300 stock, so I am now worried about restoring the bedding when I replace the barreled action after intalling the Equalizer. I use the rifle for 10m competition.
What torque settings would you advise on the various screws? Do you have any other suggestions associated with this task for simplicity or improvements?
Best regards,
Louis
July 22, 2017 at 14:48
Hi Louis,
Don’t worry about the bedding too much. Torque settings are not that critical.
I have never found any detailed torque setting information from Walther on this subject. Anschutz recommends 5Nm for their smallbore rifles, but that is M5 bolts into steel, in the Walther it is in aluminum.
What I do myself is that I use the short end of the hex key (allen key) between thumb and index finger with. When it starts to hurt my fingers I stop.
Do the side bolts first, and alternate left and right to center the action in the stock.
Good luck, Sven.
July 22, 2017 at 15:40
Thanks, Sven. That sounds like a plan. Louis
September 1, 2017 at 02:40
Hi Louis.
Where exactly did you find this kit?
I am having trouble tracking down anyone who sells them.
Thanks,
Scott.
P.S., You don’t happen to be related to a guy named J.P. from Georgia, do you?
September 1, 2017 at 09:12
Scott, You can order it from Schiesssport Billharz in Germany: https://www.schiesssport-billharz.de/shop/de/Pos.-121-Absorber-kpl.
September 1, 2017 at 12:12
Thanks! I was thinking about doing for my son the same thing you are doing: upgrading a LG400 Blacktec.
September 3, 2017 at 09:11
Hi.
I bought the kit from Schiesssport Buinger; it’s Walther Part No. 2781573 and you would need the foam rubber buffer pad (moosgummi – lovely word) 2707110 too.
The upgrade kit consists of the counterweight, magnet and spring all pre-assembled. There are no instructions worthy of the name. I have prepared a set if Sven would allow them to be published here but it’s not rocket science.
The major issues are: loosening the loading lever click-stop spring grub screw (fortunately, the ball-bearing caught in my watch strap!) and overcoming the thread locker on the cavity plug (use a solid vice and a tight-fitting hex-head socket). I would counsel a Teflon oil (one drop) for the counterweight assembly as its steel/aluminium and a Teflon grease (same reason) to hold the click-stop ball-bearing during reassembly.
The upgrade does make a noticeable difference.
September 3, 2017 at 14:34
Hello Louis,
I would be pleased to publish your instructions for the Absorber installation. I will send you an email so you can send me the document by mail. Thank you. Sven.
April 27, 2018 at 13:17
Hello Sven & Louis,
Any chance to view instructions on this ?
Thanks
AdminMASTER
http://www.Pimpmyairgun.com
April 27, 2018 at 14:29
Hi Peter,
Good to hear from you. I inserted the instructions from Louis above here in the text of this Web page.
Cheers, Sven.
March 2, 2019 at 17:34
The LG300 series introduced an spring loaded Absorber (pict. 2). Some air from the shot is directed backwards through the pellet probe (no. 26) and a plunger (no. 27) moves backward against a spring to counteract the forward moving pellet.
Walther Drawing 265 07 11 LG300 Spring Absorber
Dear Sven
Have you ever thought of inserting the LG 300 Adsorber System on the LG 300 dominator?
Mechanically can it be done and could it have positive results?
thanks a lot
March 4, 2019 at 11:08
Hello Dino,
I have never thought about putting an Absorber in the LG300 Dominator. That is because the first type Absorber (the spring loaded type) is not doing it’s job very well. Another reason is that it is not a matter of just switching some parts. You would need to bore the rear portion of pellet probe channel of the Dominator block to a larger diameter, and make a thread in it for the stop screw at the end.
And later on I started shooting the LG400 which already has the magnetic Absorber system so I had no need any more to modify my Dominator.
I know that maybe there are some newer LG300 Dominators around that are built on a system block that already has a larger channel for the pellet probe. On these rifles it may be possible to fit an Absorber system. But possibly only the spring loaded Absorber type will fit. And for the pneumatic and magnetic versions you would need also to bore the system block for the very small holes to let the air out and to adjust the Absorber movement.
When you would like to have a very still (quiet) shooting Walther I would advise to buy an LG400. The LG400 Blacktec rifles are reasonably priced. Standard they do not have an Equalizer (as the Absorber system for the LG400 is called) but it can be fitted on request (which would cost about a 100 Euro I guess). The LG400 system will fit the LG300 riflestocks. So you can choose to order a rifle system on;ly (barrel with systemblock and cilinder).